Finding one suspicious file on a hacked WordPress site rarely means the job is done. Most infections spread across several files, hide in the database, and sometimes reach into user accounts and server settings at the same time, so a real cleanup has to check all of it, not just the file someone happened to notice first.
A typical infection can include modified core files, malicious plugin or theme code, web shells, hidden backdoors, injected scripts, spam redirects, exposed backup files, weak admin accounts, vulnerable plugins, and hardening gaps that let the attacker come back after you think the site is clean.
This guide walks through cleaning a hacked WordPress site using SiteFort: scan the site, work through the highest-risk findings first, repair or remove the malware, clean up affected content, patch whatever let the attacker in, harden WordPress, lock down login access, and verify the site is actually clean before you move on.
Not sure you’re dealing with a hack in the first place? Start with our guide on 12 warning signs your WordPress site has been hacked. This article picks up once you already suspect or have confirmed malware.
Before You Start: Back Up the Infected Site
Before you remove anything, take a full backup of the site as it currently stands.
Even with malware in it, that backup is worth having. It preserves the exact state of the site in case you need to check what changed, recover something you accidentally deleted, or trace back to how the attacker got in.
Back up:
- WordPress files
- The database
wp-config.php.htaccessor Nginx rules- Access logs and error logs if available
Label it clearly as infected so nobody restores it by mistake later.
If the site is redirecting visitors, throwing browser warnings, serving malware, or sending spam, put it in maintenance mode while you work.
Step 1: Check the Public Site First
Start with an outside view of the site. Some hacks only show up to search engines, mobile visitors, first-time visitors, or people arriving from Google Search, not to you when you’re logged in.
The Securewp Remote Security Scanner checks public-facing issues such as:
- Visible malware indicators
- Suspicious redirects
- SEO spam
- Blacklist status
- Exposed sensitive files
- SSL issues
- Security header problems
This gives you a fast outside read, but it can’t see private WordPress files, plugin code, theme files, database content, user accounts, or internal hardening gaps. For that, you need to get inside WordPress with SiteFort.
Step 2: Run a SiteFort Security Scan
Install SiteFort, open the dashboard, and run a security scan.
SiteFort scans the site from inside the WordPress installation and organizes what it finds across malware, file integrity, accounts, content and database safety, reputation, vulnerabilities, server state, severity, detection type, and recommended remediation.
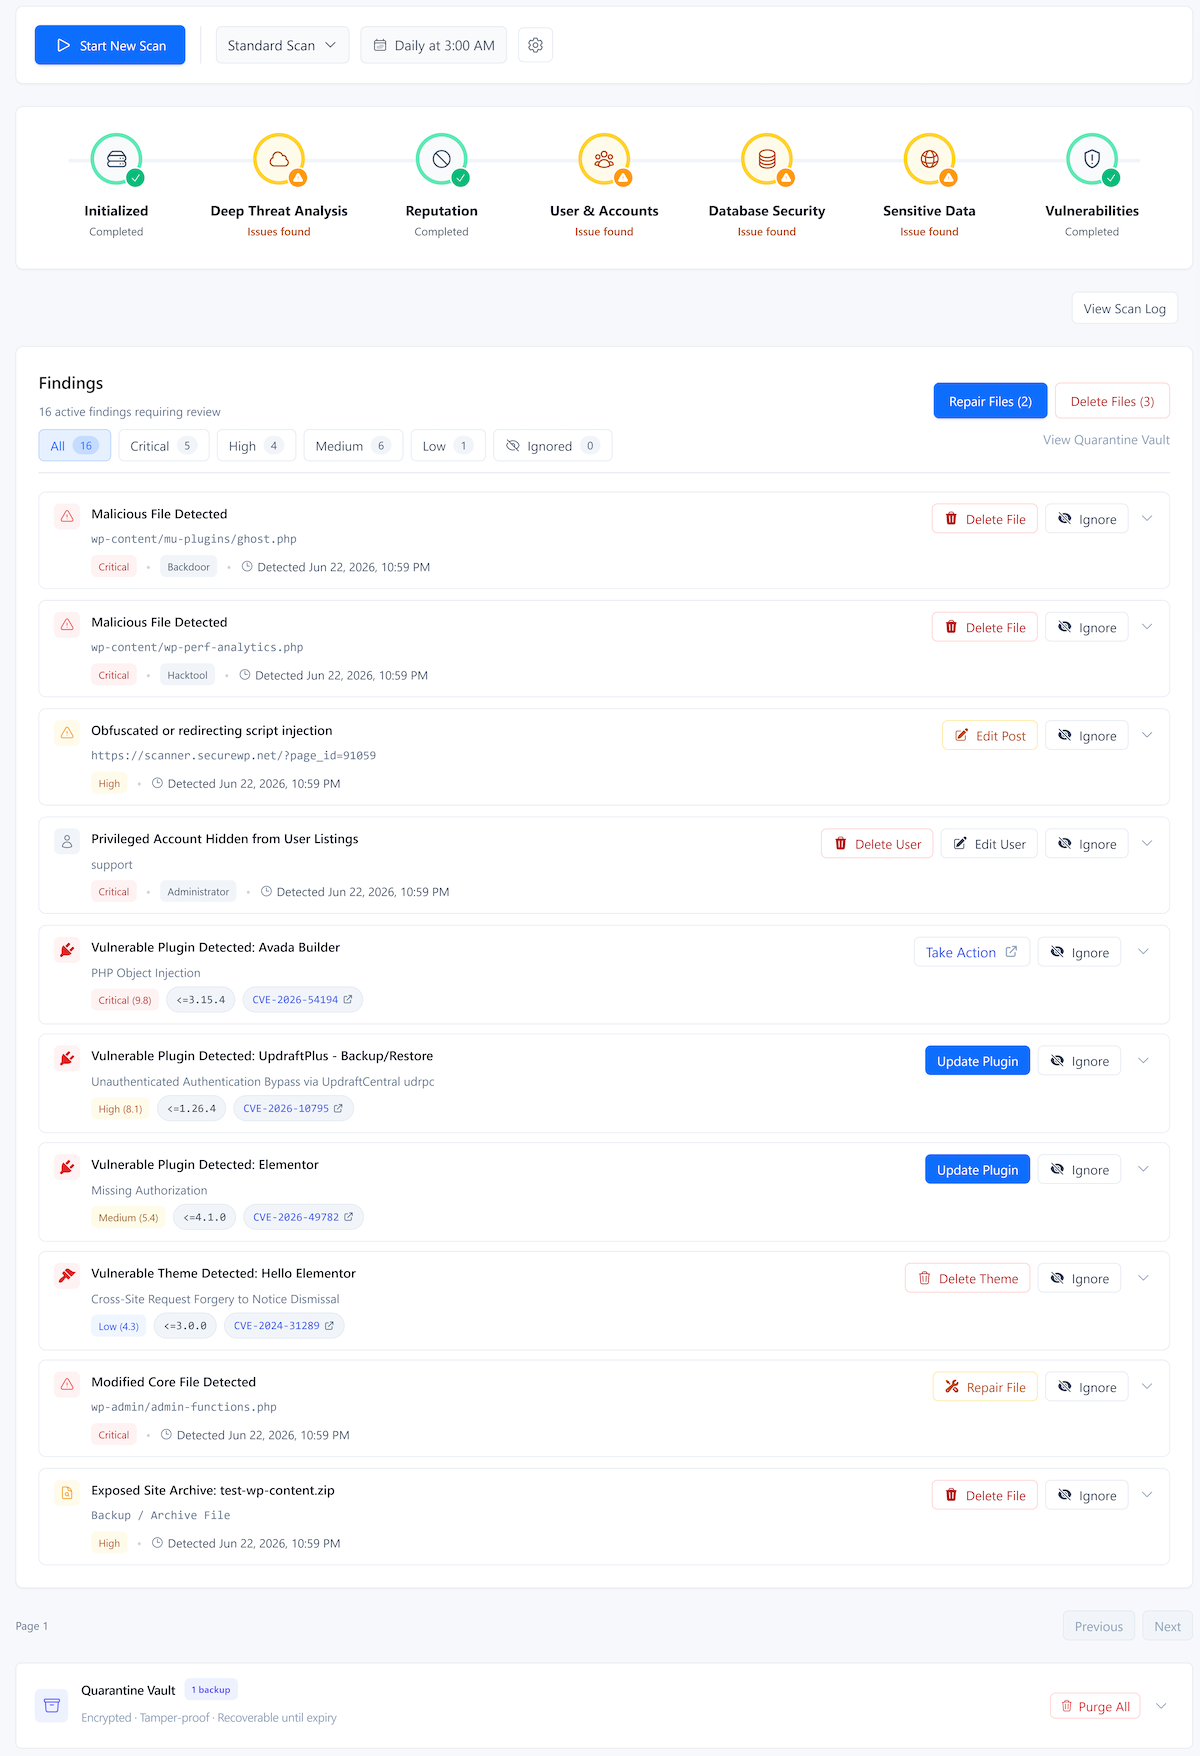
A scan can surface:
- Malware and malicious PHP files
- Backdoors and web shells
- Modified WordPress core files
- Plugin and theme file changes
- Injected scripts
- SEO spam and suspicious redirects
- Executable files sitting in uploads
- Suspicious URLs and unsafe content indicators
- Database and content safety issues
- Hidden or unexpected administrator accounts
- Weak or breached password risks
- Exposed backups, logs, config files, and debug files
- Vulnerable WordPress core, plugin, and theme versions
- Server state and hardening gaps
Work the highest-risk findings first. Confirmed malware, backdoors, modified core files, suspicious PHP files in uploads, exposed backups, and vulnerable plugins take priority over lower-severity warnings.
Step 3: Review Findings by Severity and Type
Not every finding calls for the same response. What SiteFort surfaces, and what you do about it, breaks down roughly like this:
- Modified core files: repair or restore from a clean source.
- Confirmed malware: delete, repair, or quarantine, depending on the file.
- Suspicious files: review before removing, especially anything that belongs to custom code.
- Vulnerable plugins or themes: update, replace, or remove.
- Database and content findings: clean the specific post, page, widget, option, or field where the issue lives.
- Account risks: remove unknown users, reset passwords, enable two-factor authentication.
- Hardening issues: address these once the active infection is actually gone.
The order matters more than it might seem. Clean up one infected file and leave a backdoor, a weak admin account, or a vulnerable plugin in place, and the malware just comes back.
Step 4: Repair File Integrity Issues
WordPress core files should match the official release exactly. When an attacker modifies core files, their code can run before your theme or plugins even load, which is part of what makes this kind of infection so persistent.
If SiteFort flags file integrity issues, use the repair or restore option where it’s available. It’s a safer path than manually picking through suspicious code line by line and guessing what’s original and what isn’t.
Depending on the finding, SiteFort can help you:
- Repair modified WordPress core files
- Restore clean plugin files
- Restore clean theme files
- Replace infected files with trusted versions
- Quarantine suspicious files before deleting them
If a flagged file belongs to custom code, a custom theme, or an unsupported premium product, compare it against a clean copy from the original developer before you remove anything.
Step 5: Quarantine, Delete, or Repair Malware Findings
Let the scan results guide the file cleanup rather than searching blind.
Pay close attention to malware or suspicious files in:
wp-content/uploads/wp-content/mu-plugins/wp-content/plugins/wp-content/themes/wp-includes/- Cache folders
- Temporary folders
- Backup folders
Common red flags include unknown PHP files sitting in uploads, web shell behavior, obfuscated code, injected scripts, suspicious redirects, spam injection code, or a file that keeps reappearing after you’ve already deleted it.
Quarantine anything you want to review before it’s gone for good. Delete confirmed malware once you’re confident it’s not needed. Repair or restore where SiteFort has a trusted clean source to pull from.
Run another scan after cleanup. If the same file comes back, something else is still active, usually another backdoor, a vulnerable component, a scheduled task, or a compromised account.
Step 6: Clean or Replace Infected Plugins and Themes
Plugins and themes are both a common way in and a common place to hide. How you handle a flagged one depends on where it came from:
- WordPress.org plugins: update, reinstall, or restore from a clean source.
- Premium plugins and themes: restore where supported, or grab a clean copy from the original vendor.
- Custom code: compare the finding against your developer’s clean version.
- Nulled plugins or themes: delete entirely and replace with legitimate software. There’s no clean version to restore from here.
While you’re in there, clear out anything you’re not using. Inactive plugins and themes can still carry vulnerable code or malware files even if they’re switched off.
Remove:
- Unused plugins
- Unused themes
- Abandoned plugins
- Unknown plugin folders
- Nulled or pirated software
- Old ZIP backups sitting in public directories
Deactivating a suspicious plugin isn’t enough on its own. If it’s not needed, or you can’t trust it, delete it.
Step 7: Review Content and Database Safety Findings
Not all WordPress malware lives in files. A lot of infections inject spam, scripts, suspicious URLs, hidden links, or redirect code directly into content stored in the database.
This shows up often with:
- Redirect hacks
- Japanese keyword hacks
- Pharma spam
- Casino or betting spam
- Fake product pages
- Injected JavaScript
- Hidden links
SiteFort’s content and database safety findings point you to the specific indicators, which beats manually scrolling through database tables hoping something looks off.
Review anything flagged as:
- Injected scripts
- Suspicious URLs
- Hidden links
- Spam keywords
- Redirect indicators
- Unsafe content indicators
- Suspicious options
- SEO spam symptoms
These can show up in posts, pages, widgets, menus, page builder fields, custom HTML blocks, code snippet entries, or WordPress options. Go slowly with page builder fields and serialized data in particular. A careless edit there can break layout or plugin settings just as easily as it removes the spam.
Step 8: Review Account and Administrator Risks
Attackers often create an admin user, or quietly take over an existing one, specifically so they can get back in after the obvious malware is gone.
Use SiteFort’s account security findings, ghost administrator detection, password risk checks, and audit logs to check account safety. Look for:
- Hidden or unexpected administrator accounts
- Recently created admin users
- Suspicious email addresses
- Numeric or random usernames
- Risky user roles
- Weak password risks
- Breached password risks
- Unexpected user or role changes
- Login activity that doesn’t match normal usage
Remove anything you don’t recognize, downgrade users who don’t need admin access, reset passwords for the legitimate administrators, and turn on two-factor authentication.
Step 9: Patch Vulnerabilities Found by SiteFort
A cleanup isn’t finished until you’ve closed whatever let the attacker in to begin with.
Go through SiteFort’s vulnerability findings for core, plugins, and themes, and prioritize by severity. Common entry points include:
- Vulnerable plugins
- Vulnerable themes
- Outdated WordPress core
- Nulled plugins or themes
- Weak or reused passwords
- Compromised FTP/SFTP credentials
- Old staging sites
- Exposed backups
- Unsafe file permissions
- Unrestricted file upload vulnerabilities
If a plugin is vulnerable and there’s no patch yet, disable or remove it until one ships. If it’s abandoned, replace it with something actively maintained.
Step 10: Reset Access and Security Keys
Once the malware is out and the vulnerabilities are patched, reset access so an attacker can’t just walk back in with stolen credentials, an old session, or an exposed key.
Reset:
- WordPress administrator passwords
- Hosting control panel password
- SFTP/FTP passwords
- Database password
- Cloudflare or DNS account password
- Email account passwords used for password resets
- Payment, CRM, or API keys exposed on the site
Also regenerate the WordPress authentication salts and security keys in wp-config.php. This forces every existing login session to expire, including any the attacker might still be holding.
Step 11: Apply Verified Hardening with SiteFort
Once the site is clean, hardening is what keeps it that way. SiteFort can help apply and verify controls such as:
- Disabling file editing in the WordPress dashboard
- Blocking PHP execution in uploads, where supported
- Protecting sensitive files like
wp-config.php, backups, logs, debug files, and Git directories - Reducing user enumeration
- Restricting XML-RPC if you’re not using it
- Controlling application password behavior where appropriate
- Reducing WordPress version and metadata exposure
- Checking security headers
- Confirming that supported hardening rules are actually enforced
That last point is the one people skip. A hardening setting only helps if it’s actually working on your specific hosting environment. SiteFort checks whether the rules it applies are actually being enforced, not just whether the toggle is switched on.
Step 12: Secure WordPress Login with SiteFort
Weak login security is how a lot of “cleaned” sites get reinfected. SiteFort’s login features cover:
- Role-based two-factor authentication
- Authenticator app codes, email codes, or recovery codes
- CAPTCHA where appropriate
- Brute-force lockouts
- Safer login responses that reduce username guessing
- Weak password risk review
- Breached password risk checks
- Strong password enforcement by role
- Password expiration policies where appropriate
- A custom login URL, if that fits your workflow
Changing the admin password alone isn’t enough. Login security needs to stop both credential attacks and automated login abuse, and those call for different defenses.
Step 13: Enable Firewall and Bot Protection
Attackers tend to keep probing a site long after the visible infection is gone, so firewall and bot protection matter most right after a cleanup, not months later. SiteFort covers:
- Blocking bad bots
- Blocking suspicious IPs or CIDR ranges
- Country blocking, where appropriate
- User-agent blocking
- Rate limiting
- 404 probe controls
- Vulnerability-hunting bot protection
- Community threat intelligence
- Cloudflare Sync for supported rules where configured
Step 14: Review Audit Logs and Monitor Activity
Monitoring after cleanup is how you find out whether an attacker is still trying to get back in. SiteFort’s audit logs and scan history cover events such as:
- Successful logins
- Failed login attempts
- Lockouts
- Two-factor authentication events
- User changes
- Plugin and theme changes
- Firewall blocks
- Malware scan results
- Hardening changes
- Vulnerability findings
- Settings changes
Repeated login attempts, new suspicious files, repeated vulnerability hits, or firewall blocks from the same sources are all worth digging into further. Reinfection risk stays highest when the original entry point is still open.
Step 15: Check Google Search Console and Search Results
If the hack showed Google warnings, SEO spam, malicious redirects, or odd search snippets, check Google Search Console once cleanup is done.
Google’s Security Issues report flags sites it believes were hacked or may harm visitors, covering things like malware, phishing, or unwanted software. Review:
- Security Issues: hacked content, malware, phishing, or unwanted software
- Manual Actions: spam or hacked-site actions
- Pages: unexpected indexed spam URLs
- Sitemaps: unknown spam sitemaps
- Users and permissions: unauthorized Search Console users
- URL Inspection: what Google actually sees after cleanup
If the attacker created fake spam URLs under your domain, make sure they return a proper 404 or 410 once you’ve cleaned up. Don’t just redirect every hacked URL to the homepage.
Only request a Google review once the site is clean, hardened, and no longer serving spam or malware. Requesting it too early usually means doing it twice.
Step 16: Verify the Cleanup
Scan again once you’re done, and check it from more than one angle. Go through:
- A fresh SiteFort security scan
- A fresh Securewp Remote Security Scanner result
- SiteFort file integrity findings
- SiteFort content and database safety findings
- SiteFort account security findings
- SiteFort vulnerability findings
- SiteFort hardening verification
- Audit log activity
- Google Search Console
- Logged-out browser behavior
- Mobile behavior
- Google Search result behavior
If the same malware turns up again, the cleanup isn’t finished. The likely cause is a hidden backdoor, a vulnerable plugin, a compromised account, an infected database entry, an exposed credential, or another infected site sharing the same hosting account.
When to Get Professional Malware Removal Help
SiteFort can detect, repair, harden, and monitor a wide range of WordPress malware issues on your own. Some infections still call for hands-on cleanup, especially when things are complicated or the site can’t afford downtime.
Get professional help if:
- The site keeps getting reinfected
- You can’t access the WordPress dashboard
- The host suspended the site
- Google is showing security warnings
- Search results show pharma, Japanese, casino, or fake product spam
- Unknown admin users keep appearing
- You’ve found suspicious database entries but aren’t sure how to safely remove them
- The site handles payments, customers, memberships, or sensitive data
- You don’t have a clean backup to fall back on
If you need hands-on help, our WordPress malware removal service can clean the infection, remove backdoors, repair damaged files, and help reduce the odds of reinfection.
Cleanup Means More Than Deleting Files
Cleaning WordPress malware is never just about deleting suspicious files. A complete cleanup scans files, repairs integrity issues, removes malware, checks content and database safety, reviews account risks, patches vulnerabilities, applies verified hardening, secures login, enables firewall protection, and keeps monitoring activity afterward.
Use the Securewp Remote Security Scanner to see what visitors and search engines can spot from outside. Use SiteFort inside WordPress to scan files, repair what’s supported, check database and content safety, catch hidden administrator risks, review vulnerabilities, apply and verify hardening, strengthen login security, and monitor activity going forward.
If malware comes back after a cleanup, the root cause is still there somewhere. Find the entry point, remove the backdoor, and scan again to confirm.