Your ads stop running, your account shows a “malicious or unwanted software” disapproval, and the site looks completely normal when you check it yourself. That gap, between what Google Ads is seeing and what you’re seeing, is what makes this policy violation so frustrating to fix.
Google Ads may disapprove your ads if your website, landing page, or linked resources appear to contain malware, unwanted software, suspicious redirects, injected scripts, or unsafe third-party domains.
This can happen even after the visible malware has already been removed. In a lot of WordPress cases, Google Ads is still detecting an unsafe script, hidden external link, cloaked redirect, infected plugin file, suspicious database entry, or third-party resource that only loads under certain conditions.
This guide explains how to investigate and fix a Google Ads malware disapproval on a WordPress site, especially when the website looks clean to normal visitors but Google Ads keeps rejecting the ads anyway.
Quick answer: find the exact unsafe resource Google Ads is flagging, whether that’s a hidden link, an injected script, or a cloaked redirect, remove it and whatever created it, verify it’s actually gone from every angle Google might check, and then appeal with specifics. Skipping straight to the appeal before verifying usually just costs you another review cycle.
Why Google Ads Flags a WordPress Site
Google Ads doesn’t just review your ad text. It also checks the destination URL, the landing page, linked resources, redirects, scripts, downloads, and sometimes signals connected to the broader site.
Common reasons this policy gets triggered include:
- Malware or injected JavaScript on the landing page
- Hidden external links to unsafe domains
- Search-only or mobile-only redirects
- Compromised WordPress plugins or themes
- Suspicious scripts loaded through widgets, page builders, or tag managers
- Old malware files still accessible on the server
- Unsafe push notification, popup, or ad network scripts
- Exposed backup, debug, or configuration files
- Blacklisted domain or server IP reputation issues
- Google Ads cached an earlier infected version and needs a fresh review
If the site was recently hacked, don’t assume the ads will get approved right after you remove one file. Google Ads can still be picking up hidden links, unsafe scripts, or suspicious resources that got missed during cleanup, particularly if the underlying backdoor that let the attacker in wasn’t found and closed.
Step 1: Collect Details from Google Ads
Start by pinning down the exact policy issue in Google Ads.
Open Google Ads and review:
- The disapproved ad
- The affected final URL
- The policy label shown by Google Ads
- Any listed unsafe domains or example URLs
- Whether the issue affects one ad, one landing page, or the whole account
If the message isn’t clear, contact Google Ads support and ask for any example unsafe domains or landing URLs they can share. Google won’t always reveal the exact source location inside your site, but support can sometimes provide the unsafe domains detected during review.
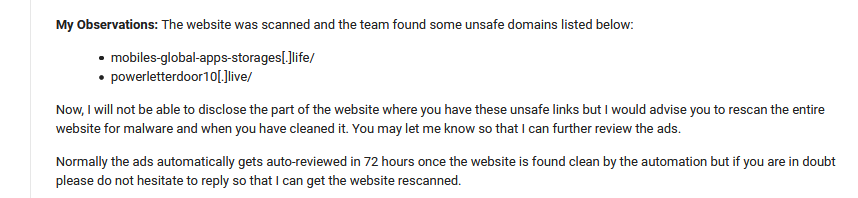
Save these details. You’ll need them later to search the site, cross-check scan results and database findings, and write the appeal.
Step 2: Run an External Scan
Next, check what the public website is actually showing from outside WordPress.
Use the Securewp Remote Security Scanner to check for public-facing issues such as:
- Visible malware indicators
- Suspicious redirects
- SEO spam
- Unsafe external links
- Blacklist status
- Exposed files
- SSL and security header issues
Some infections stay invisible to you specifically because you’re logged in as an administrator. They may only show up for logged-out visitors, search visitors, mobile users, or Google’s own crawlers, which is exactly the audience Google Ads is reviewing.
If the scanner turns up the unsafe domain Google Ads mentioned, that’s a strong lead. If it doesn’t find anything, move on to an internal scan. External scanners can only see what the public page outputs; they can’t inspect private WordPress files, database entries, plugin code, or hidden admin risks.
Step 3: Run a SiteFort Security Scan
Install SiteFort, open the dashboard, and run a full security scan.
SiteFort scans the site from inside the WordPress installation, surfacing malware, suspicious files, unsafe content indicators, suspicious URLs, file integrity issues, vulnerable plugins and themes, hidden administrator risks, exposed files, hardening issues, and reputation signals.
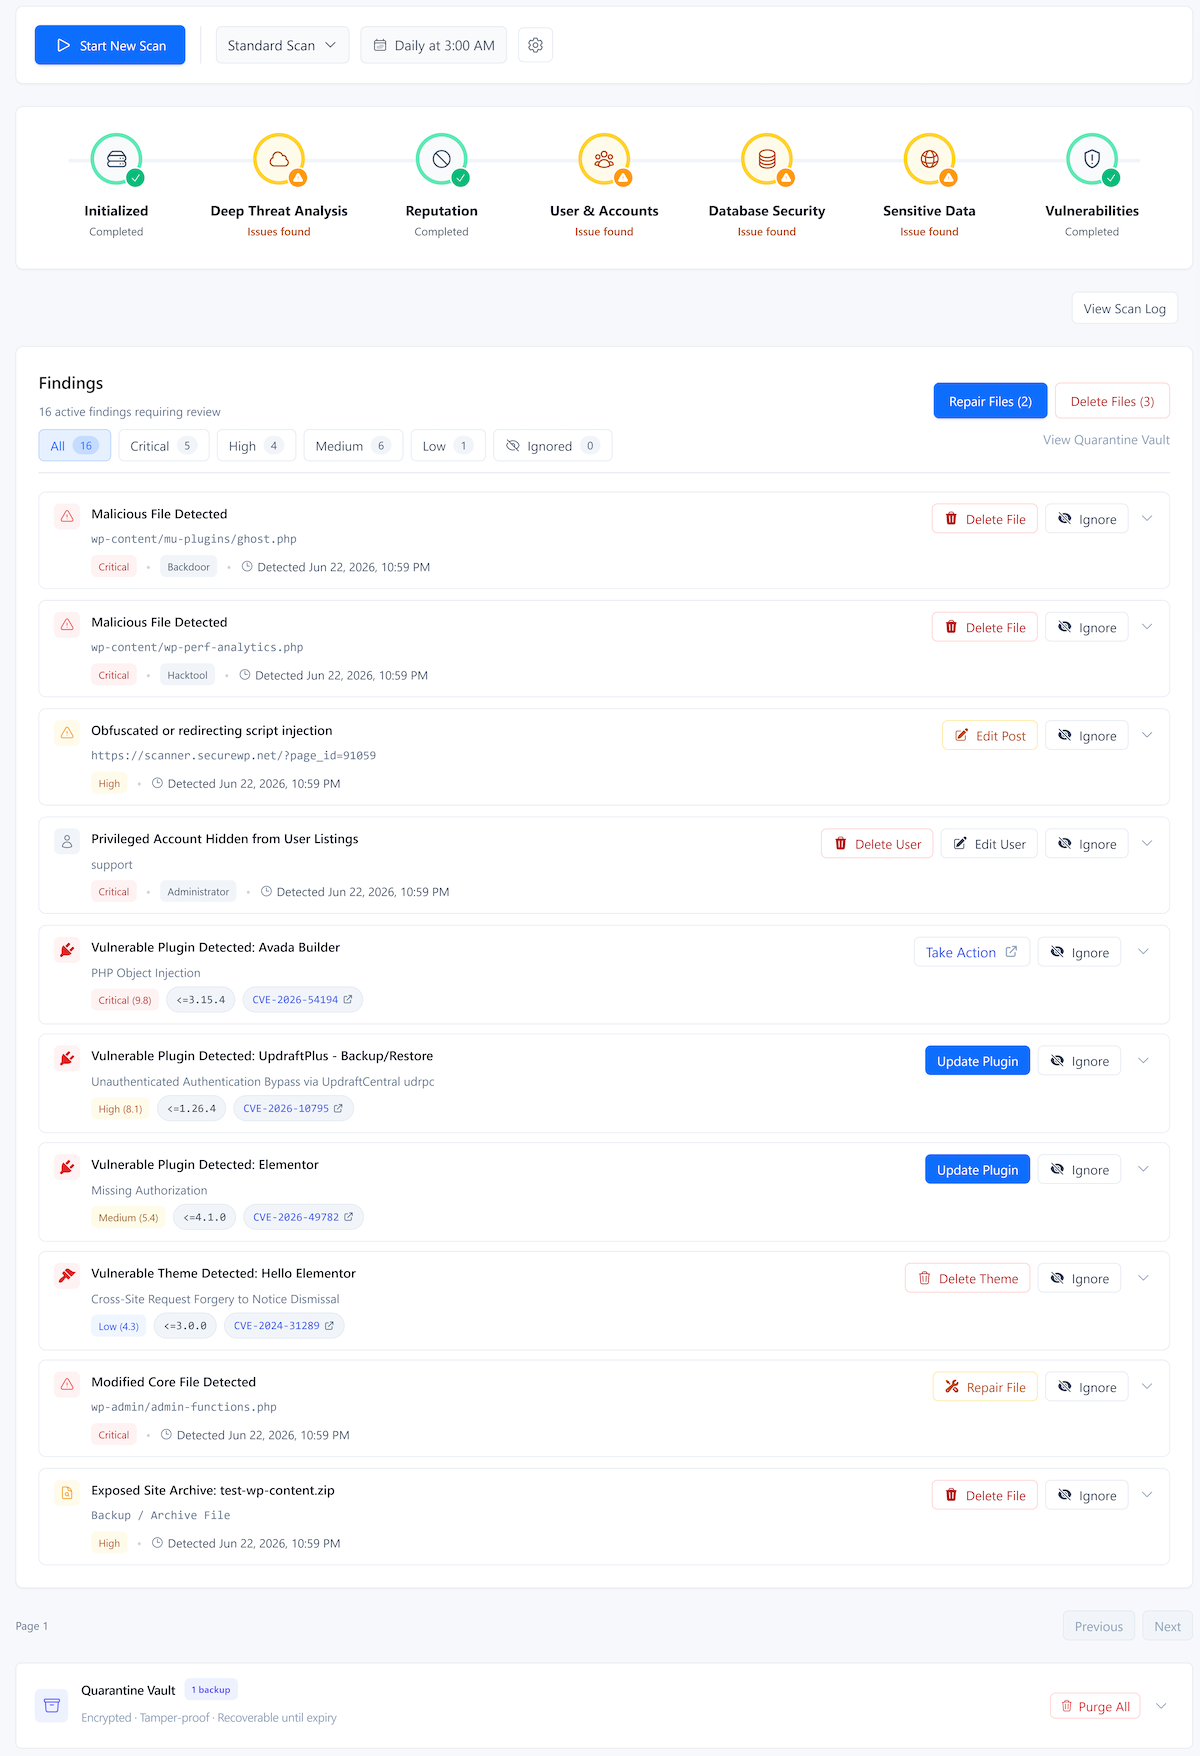
For a Google Ads disapproval specifically, pay closest attention to:
- Suspicious URLs
- Injected scripts
- SEO spam indicators
- Malicious redirects
- Content and database safety findings
- Modified plugin, theme, or core files
- Executable files in uploads
- Backdoors and web shells
- Exposed backups, logs, config files, and debug files
- Vulnerable plugins, themes, or WordPress core
If Google Ads gave you an unsafe domain or keyword, search for that domain, or a unique fragment of it, directly in the scan results and suspicious URL findings.
Step 4: Find Hidden Links and Scripts
Google Ads disapprovals often trace back to hidden links or scripts that never show up on a normal visit to the page.
Start with whatever domain or keyword Google Ads provided. Treat any suspicious domain you find as an investigation lead, not as something to publish or share publicly.
The patterns below are common naming conventions in malicious scripts, not search terms to type in verbatim. Look for anything resembling:
- A suspicious domain or keyword fragment
- Ad-serving parameters like
zoneid - Suspicious file names such as
apu.phporntfc.php - Unfamiliar minified scripts like
tag.min.js - Push notification scripts you didn’t install
- Unknown external scripts
- Unknown ad network domains
- Unknown redirect domains
Check these areas first:
- SiteFort suspicious URL findings
- SiteFort content and database safety findings
- Posts and pages
- Widgets
- Menus
- Page builder fields
- Custom HTML blocks
- Code snippet plugins
- Theme header and footer files
- Tag Manager containers
- Popup, push notification, ad, and analytics plugins
If you can’t reproduce what Google Ads is seeing, test the site from more angles:
- Open the page while logged out
- Use an incognito or private browser window
- Test from mobile
- Click through from Google Search instead of typing the URL directly
- Try a different browser
- Test from another network or VPN
- Clear cache and CDN cache before retesting
This matters because malicious scripts often cloak themselves, loading only for search visitors, mobile users, first-time visitors, or specific referrers. A script that never shows up when you check the site directly can still be exactly what Google Ads is flagging.
Step 5: Clean the Findings in SiteFort
Once you’ve got malware, suspicious files, suspicious URLs, unsafe content indicators, or file integrity issues identified, clean each one based on what type of finding it is.
Depending on what SiteFort surfaces, remediation can include:
- Repairing modified WordPress core files
- Restoring clean plugin or theme files where supported
- Quarantining suspicious files before deletion
- Deleting confirmed malware
- Reviewing and cleaning suspicious content and database indicators
- Removing exposed backup, log, config, or debug files
- Patching vulnerable plugins, themes, or WordPress core
Don’t stop at removing the visible unsafe link. Trace where it actually came from. If a vulnerable plugin, an infected theme file, a hidden backdoor, or a suspicious database entry created that link, it will simply come back after you delete it once.
Step 6: Clean Content and Database Injections
Some Google Ads issues trace back to scripts or links stored in the WordPress database rather than in files, which is easy to miss if you’re only checking file changes.
These commonly turn up in:
- Posts and pages
- Post meta
- Widgets
- Menus
- Page builder fields
- Custom HTML blocks
- Theme options
- WordPress options
- Code snippet plugin entries
SiteFort’s content and database safety findings flag suspicious URLs, hidden links, injected scripts, redirect indicators, spam keywords, and unsafe content indicators in these locations.
If you’re editing the database by hand, go carefully around serialized data and page builder content. A careless edit there can break page layouts or plugin settings just as easily as it removes the spam. Where you can, clean the affected field from the WordPress admin interface instead, or use a database-aware tool built for the job.
Step 7: Review Third-Party Scripts
Not every Google Ads disapproval traces back to a hacked file. Sometimes the unsafe resource is coming from a third-party script or plugin that’s technically working exactly as installed.
Review:
- Google Tag Manager containers
- Popup plugins
- Push notification plugins
- Ad network scripts
- Affiliate scripts
- Live chat scripts
- Analytics scripts
- Cookie consent scripts
- Recently added tracking pixels
If a script is loading an unknown or unsafe external domain, remove it and retest the landing page. Also check whether it’s running site-wide or only on the specific landing page used in your ads, since that changes how urgently it needs to go.
Step 8: Patch Vulnerabilities and Remove Risky Software
Cleaning up the unsafe link doesn’t help much if the entry point that let it get planted is still open.
Check SiteFort’s vulnerability findings for affected WordPress core, plugins, and themes, then update, replace, or remove whatever’s vulnerable.
Also clear out:
- Unused plugins
- Unused themes
- Abandoned plugins
- Nulled or pirated software
- Unknown plugin folders
- Old ZIP backups stored in public directories
If a vulnerable plugin has no patch yet, disable or remove it until a safe update ships. If it’s abandoned, replace it with something actively maintained.
Step 9: Harden WordPress After Cleanup
Once the unsafe links, scripts, malware, and vulnerabilities are gone, harden the site so the same issue doesn’t just reappear in a few weeks.
Apply and verify hardening controls such as:
- Disabling theme and plugin file editing
- Blocking PHP execution in uploads where supported
- Protecting sensitive files such as
wp-config.php, backups, logs, debug files, and Git directories - Reducing user enumeration
- Restricting XML-RPC if unused
- Controlling risky application password behavior where appropriate
- Reducing WordPress version and metadata exposure
- Checking security headers
- Confirming that hardening rules are actually enforced, not just switched on
Also lock down login access: two-factor authentication, CAPTCHA where appropriate, brute-force lockouts, safer login responses, strong password enforcement, and breached-password checks.
Step 10: Verify the Website Is Clean
Before you appeal, verify the site from more than one angle. Check:
- A fresh SiteFort security scan
- A fresh Securewp Remote Security Scanner result
- Google Search Console Security Issues
- Google Search Console Manual Actions
- The exact landing page used in Google Ads
- Logged-out browser source code
- Mobile behavior
- Google Search referral behavior
- CDN and cache-cleared versions of the page
- Tag Manager and third-party scripts
If Google Ads gave you example unsafe domains, confirm they no longer show up anywhere: page source, rendered DOM, SiteFort findings, external scanner results, or database and content findings.
Don’t appeal too early. If Google Ads reviews the site while anything unsafe is still present, the disapproval usually stays, and future appeals can get harder to win.
Step 11: Appeal the Google Ads Policy Decision
Once the site is genuinely clean, submit an appeal from Google Ads.
You can usually appeal from Policy Manager or from the affected ads page directly. Choose the reason that fits, typically Made changes to comply with policy.
Be specific in the appeal. Don’t just write “the site is clean.” Explain what was found, what was removed, what was patched, and how you verified the fix. Reviewers see a lot of vague appeals, and a specific one reads very differently.
Something like this works well as a starting template:
We reviewed the Google Ads malicious/unwanted software disapproval and cleaned the WordPress website.

Actions completed:
- Scanned the public website with an external security scanner.
- Ran an internal SiteFort security scan.
- Removed suspicious injected links/scripts.
- Reviewed content and database safety findings.
- Repaired or replaced affected WordPress/plugin/theme files.
- Removed exposed backup/debug/config files where found.
- Updated vulnerable plugins/themes/core.
- Reviewed administrator accounts and login security.
- Enabled hardening, firewall, and 2FA protections.
- Cleared cache/CDN cache and retested the landing page.
- Verified that the unsafe domains are no longer present.

Please review the ads and landing page again.
After submitting, keep an eye on the appeal status in Google Ads Policy Manager.
What to Do If Google Ads Still Disapproves the Website
If the ads are still disapproved, don’t just resubmit the same appeal with no new information behind it.
Instead:
- Ask Google Ads support for any example unsafe domains or URLs they can share
- Confirm whether the issue is on one landing page or the whole domain
- Check every final URL, tracking template, sitelink, asset, and redirect
- Clear CDN and server cache again
- Test from another network, browser, and mobile device
- Review Tag Manager and third-party scripts again
- Run another SiteFort scan and external scan
- Check Google Search Console Security Issues and Manual Actions
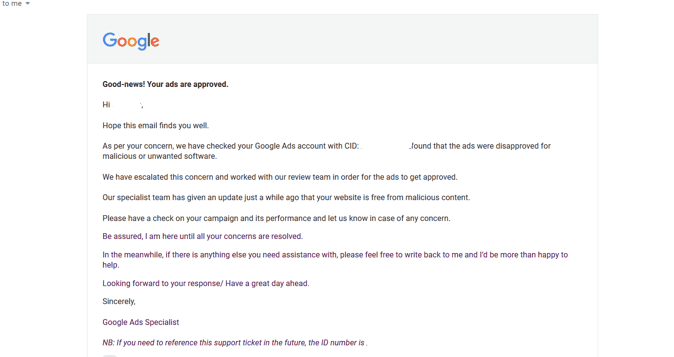
Sometimes the site is genuinely clean and Google Ads just needs a manual review to catch up. In that case, reply with a clear, specific list of what was done and ask for another review of the destination.
Common Questions About Google Ads Malware Disapprovals
How long does a Google Ads malicious software review take?
It varies, but reviews after a policy appeal typically take anywhere from a day to about a week. Sites with a clean, well-documented appeal tend to move faster than ones where the reviewer has to dig for what changed.
Can I run ads while the site is under review?
No. Ads tied to a flagged destination stay disapproved until the review clears them. Running a separate campaign to a different, unaffected destination is fine while you sort out the flagged one.
Why does Google Ads still flag my site after I removed the malware?
Usually because something related to the original infection is still active: a hidden link left in the database, a script that only loads under specific conditions, a backdoor that’s already recreated the issue, or a cached version of the site Google hasn’t re-crawled yet.
Does clearing cache affect a Google Ads review?
It can. If your CDN or server is still serving a cached, infected version of the page, Google Ads may see stale content even after you’ve fixed the source. Clear both CDN and server-side cache before you appeal, not just after.
Will a Google Ads malware disapproval affect my Search Console or organic rankings too?
It can, since the underlying cause is often the same. Malware, spam injections, or unsafe redirects that trigger a Google Ads disapproval can also trigger a Search Console security issue or manual action, so it’s worth checking both at the same time.
When to Get Professional Help
Get professional help if:
- Google Ads keeps detecting unsafe domains after cleanup
- You can’t find where the unsafe link is coming from
- The issue only appears to Google, mobile users, or search visitors
- SiteFort finds database or content indicators you’re not comfortable editing
- Malware keeps returning after removal
- The site has Google Search warnings or SEO spam
- The website handles payments, leads, customer accounts, or business-critical traffic
If you need help, our WordPress malware removal service can clean the website, remove hidden links and backdoors, review SiteFort findings, secure the site, and prepare a clear summary for your Google Ads review.
Clean, Verified, Then Appeal
A Google Ads malicious or unwanted software disapproval usually means Google detected something unsafe on the destination, a linked resource, a redirect path, or a script loaded by the landing page.
For WordPress sites, the cause is often hiding in plugin files, theme files, page builder content, database entries, third-party scripts, redirects, or old malware left behind after a partial cleanup.
Use the Securewp Remote Security Scanner to check the public page. Use SiteFort inside WordPress to scan files, content and database indicators, suspicious URLs, vulnerabilities, exposed files, account risks, and hardening issues. Then clean the findings, verify the landing page from every angle, and submit a specific Google Ads appeal.
Getting the ad approved again is really the secondary goal. The real one is making sure the site is actually clean, secure, and safe for visitors.


