Settings
Configure scan policy, alert delivery, integrations, license state, and advanced options. Settings covers anything that affects multiple modules or connects to external services.
Settings
SiteFort Settings are organized into Scanner, Notifications, Integrations, License & Plan, and Advanced. Use Settings for policies that affect multiple modules or external services.
Scanner Settings
The Scanner settings tab contains the same Scan Scope and Automated Scans controls documented under Scanner Configuration. Use this tab when you want to change scan policy without opening the Scanner slide-over.
Email Notifications
Email Notifications controls all email alerts sent by SiteFort from this site. Enter comma-separated email addresses, or leave the field blank to use the WordPress admin email. You can also send the same notifications to selected WordPress administrators.
| Notification group | Events | Recommended recipient |
|---|---|---|
| Scans & Vulnerabilities | Scan Findings, New Vulnerability Found, and Scan Failed. | Technical owner, agency support queue, or security mailbox. |
| Firewall & Login Protection | Firewall Block Summary and Login Lockout. | Site administrator or operations channel. Use digest schedule to reduce noise. |
| Account Activity | SiteFort Deactivated, Sensitive Tool Used, Two-Factor Authentication Change, and Administrator Sign-In. | Security owner or account owner. These events can indicate unauthorized changes. |
Severity threshold options are All Severities, Low and above, Medium and above, High and above, and Critical only. Firewall Block Summary supports Daily, Weekly, and Monthly digest schedules.
Webhook Delivery
Webhook Delivery sends alerts to Slack, Discord, or a custom HTTP endpoint in addition to email. Use it when alerts should reach a team channel, ticketing workflow, or SIEM-style collector.
| Provider | How it works | Setup note |
|---|---|---|
| Slack | Delivers formatted alerts to a Slack channel. | Create an Incoming Webhook in the Slack workspace under Settings > Apps. |
| Discord | Delivers color-coded alerts to a Discord channel. | Create a webhook in Discord under Channel Settings > Integrations > Webhooks. |
| Generic JSON | Delivers a signed JSON payload to a custom HTTP endpoint. | Verify each delivery using the HMAC-SHA256 signature header. |
Provider states include Active, Saved, and Not set up. Actions include Use this provider, Discard, Send test, and Save URL.
Integrations
Integrations is where SiteFort connects to external accounts and services: Cloudflare, MaxMind, and CAPTCHA providers. Connect an account here first, then turn on the feature that depends on it elsewhere in the plugin, Cloudflare Sync and Country Blocking on the Firewall page, or CAPTCHA under Hardening > Login Security.
Cloudflare Connection
Connecting Cloudflare gives SiteFort a second enforcement point, at the edge, before traffic ever reaches your server. Once connected here, blocked IPs, countries, and user-agent rules can be pushed to Cloudflare and stopped before WordPress ever loads them, using Cloudflare Sync on the Firewall page.
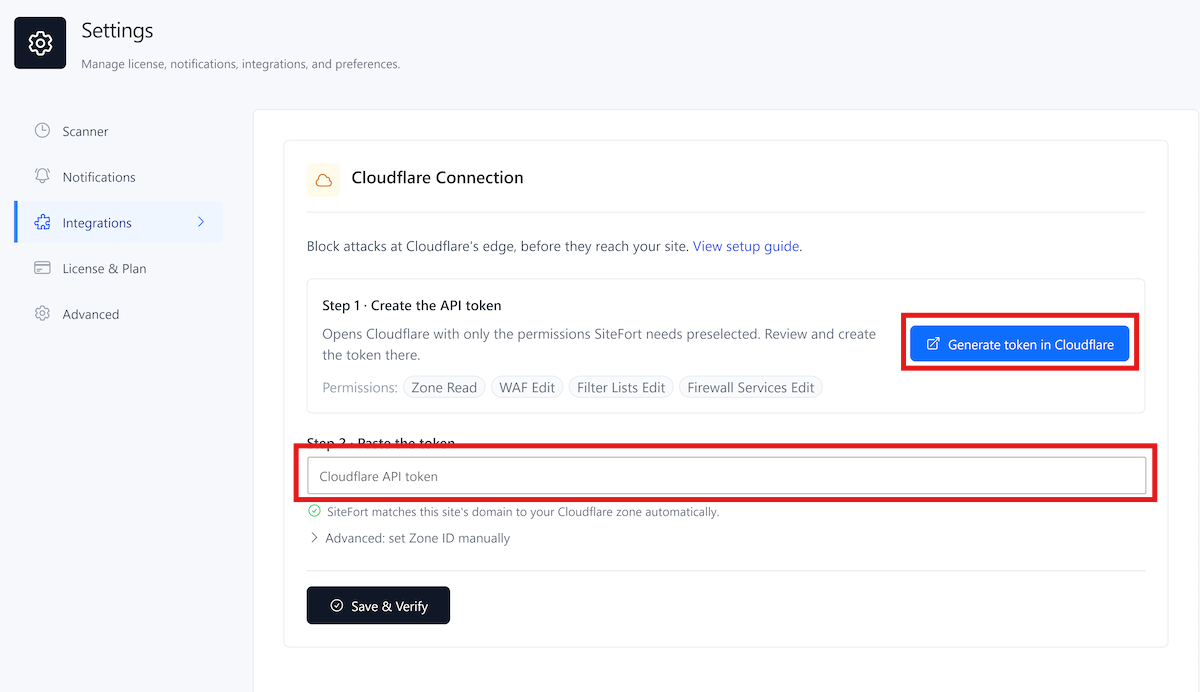
There are two ways to create the token: a one-click deep link that opens Cloudflare with every required permission already selected, or a manual path if you'd rather build the token yourself. Both produce the same result, and the deep link is the faster, lower-error option for most people.
Recommended: Generate the Token with One Click
- Click Generate token in Cloudflare.
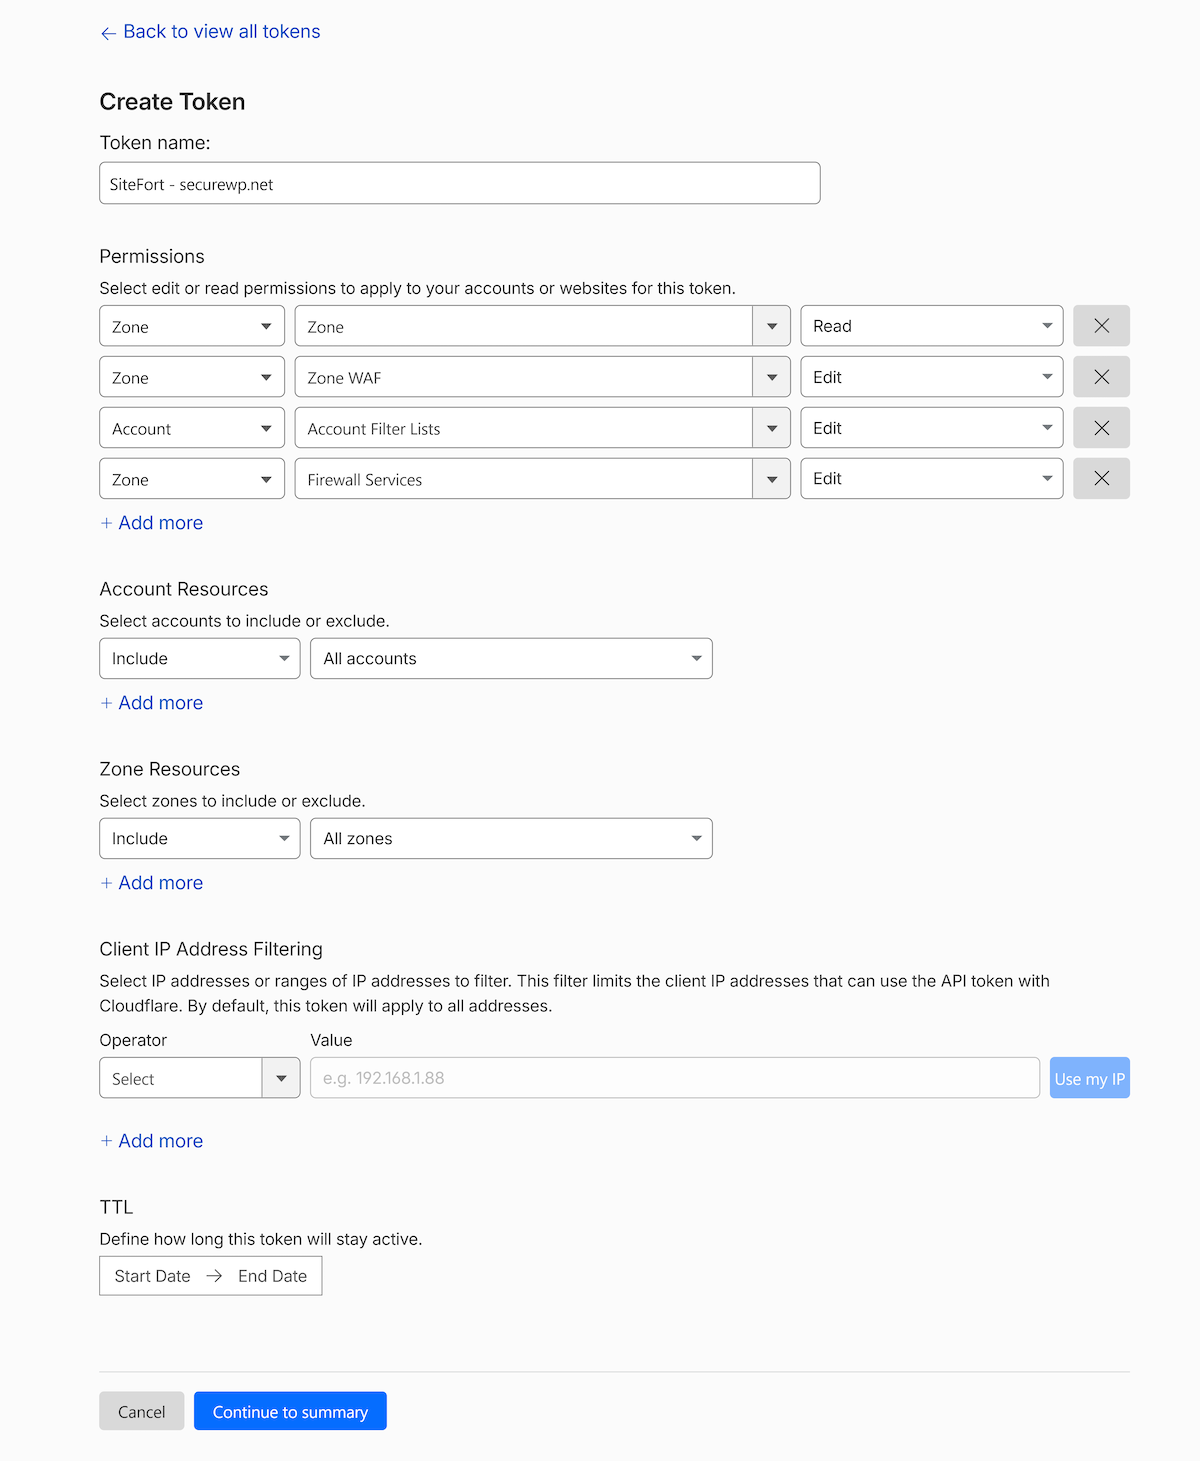
- This opens Cloudflare's token creation screen in a new tab, with Zone Read, WAF Edit, Filter Lists Edit, and Firewall Services Edit already selected for you. You don't need to add or adjust anything here.
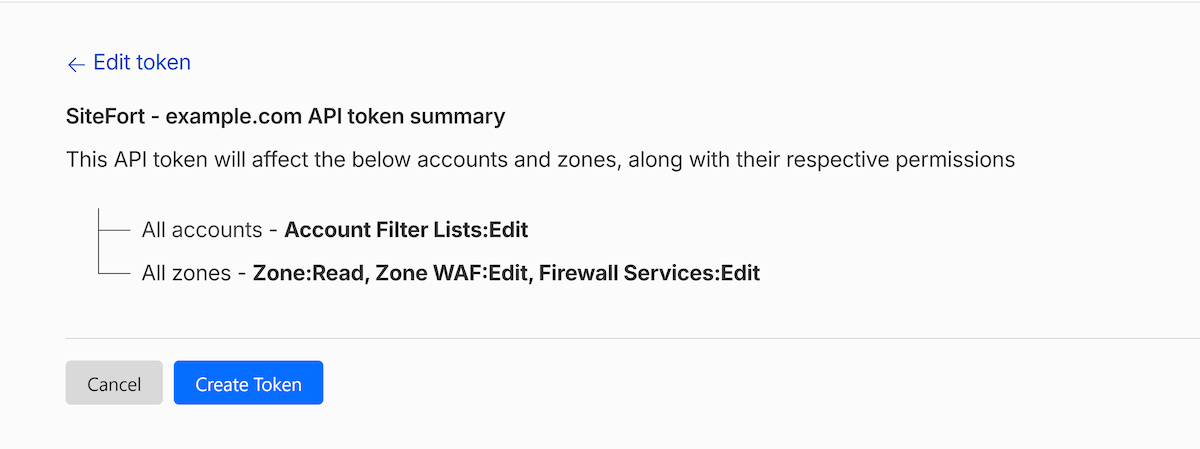
- Review the Zone Resources and Account Resources shown, then continue to the summary screen.
- Click Create Token.
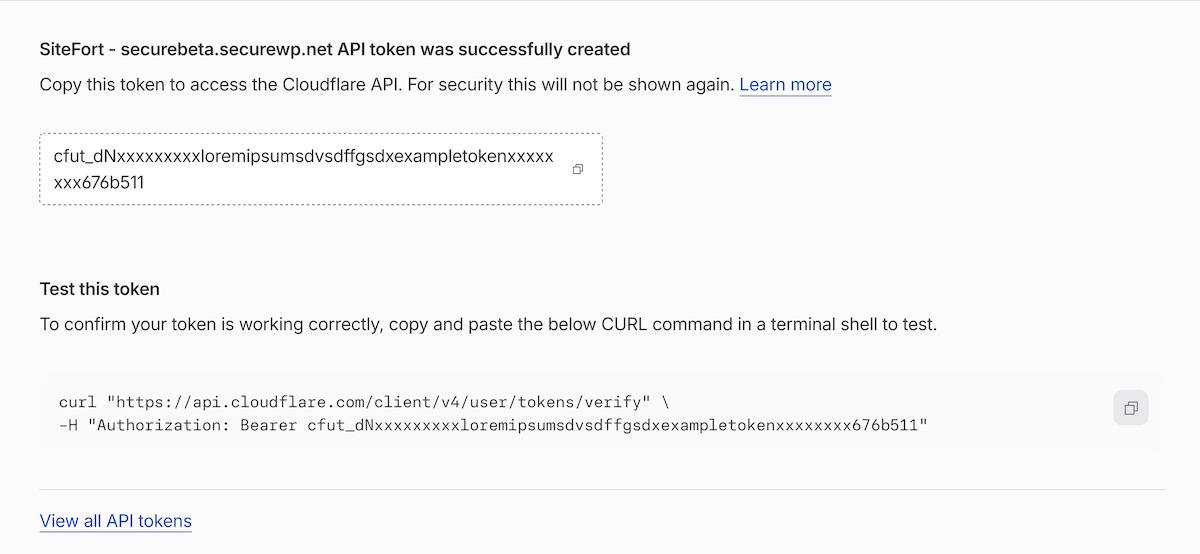
Cloudflare shows the token value exactly once. Copy it immediately, since closing the page without copying it means starting over.
Manual: Create the Token Yourself
If you'd rather not use the deep link, perhaps you're managing several sites and want to review the token before creating it, or your organization requires tokens to be created a specific way, you can build it manually with the same permissions.
- In Cloudflare, go to My Profile > API Tokens and click Create Token, then choose Create Custom Token.
- Add exactly these four permissions:
Permission Purpose Zone > Zone > Read Validate the selected zone and discover the account that owns it. Zone > WAF > Edit Create and update the SiteFort-managed custom firewall rule. Account > Filter Lists > Edit Create and update SiteFort-managed edge allow and block lists. Account > Firewall Services > Edit Manage edge-level firewall services SiteFort uses for country rules and automatic attack blocks. - Set Zone Resources to include the site's zone, and Account Resources to include the account that owns it.
- Continue to the summary screen, confirm all four permissions are listed, and click Create Token.
- Copy the token value before navigating away from the page.
Paste the Token into SiteFort
- Paste the token into the Cloudflare API Token field. SiteFort matches the site's domain to the correct Cloudflare zone automatically, so you generally don't need to set the Zone ID by hand. If you're managing a zone that doesn't match the site's domain, use Advanced: set Zone ID manually to enter it directly.
- Click Save & Verify.
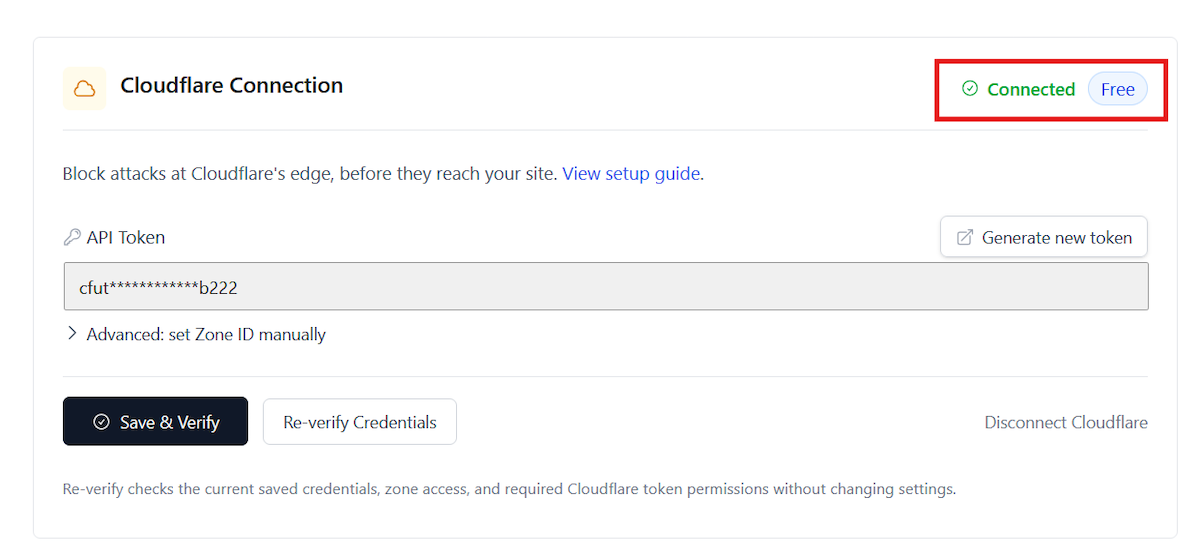
Status cards show Connection, Account ID, Permission Check, and Detected Plan. Once connected, enable and configure Cloudflare Sync on the Firewall page.
MaxMind GeoIP
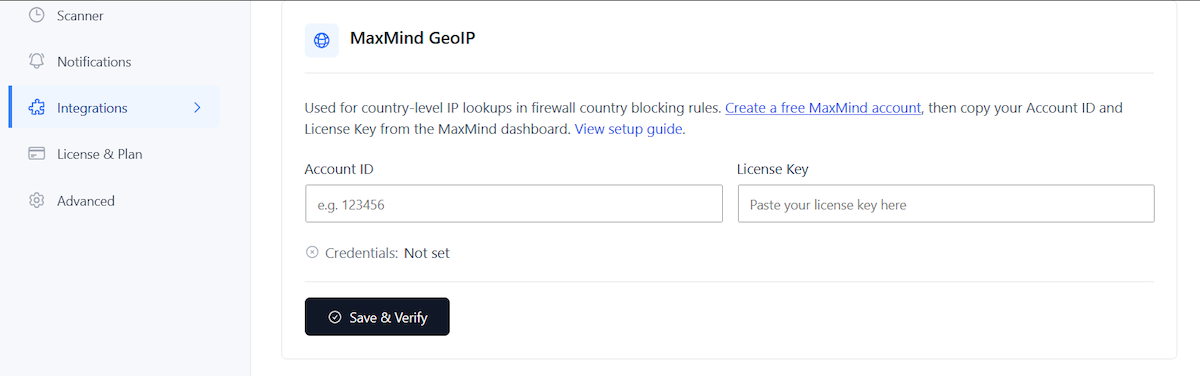
MaxMind GeoLite2 gives SiteFort a country lookup that works entirely at the server level, no runtime API calls, no dependency on Cloudflare. This is what powers Country Blocking on sites that aren't behind Cloudflare, and it also acts as a fallback on Cloudflare sites for any request that arrives without a trusted Cloudflare country header.
Step 1: Create a Free MaxMind Account
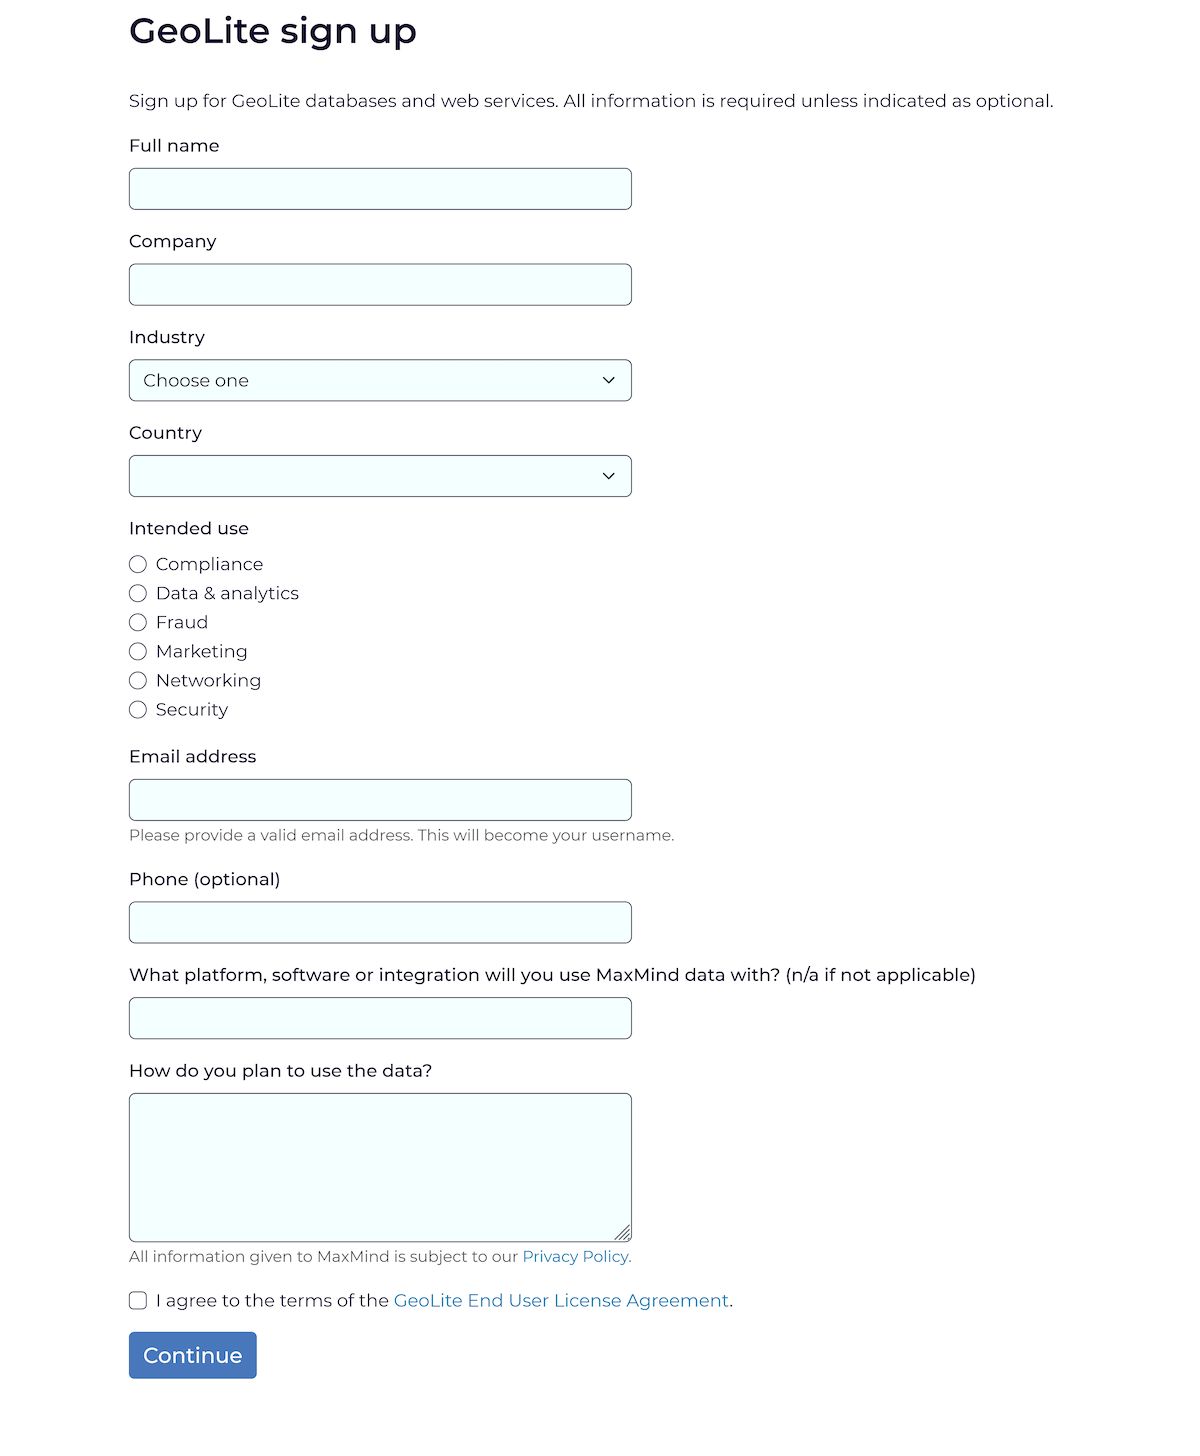
- Go to MaxMind's GeoLite2 sign-up page and create a free account. No payment details are required for the free GeoLite2 country database.
- Confirm your email address and log in to your MaxMind account.
Step 2: Generate a License Key
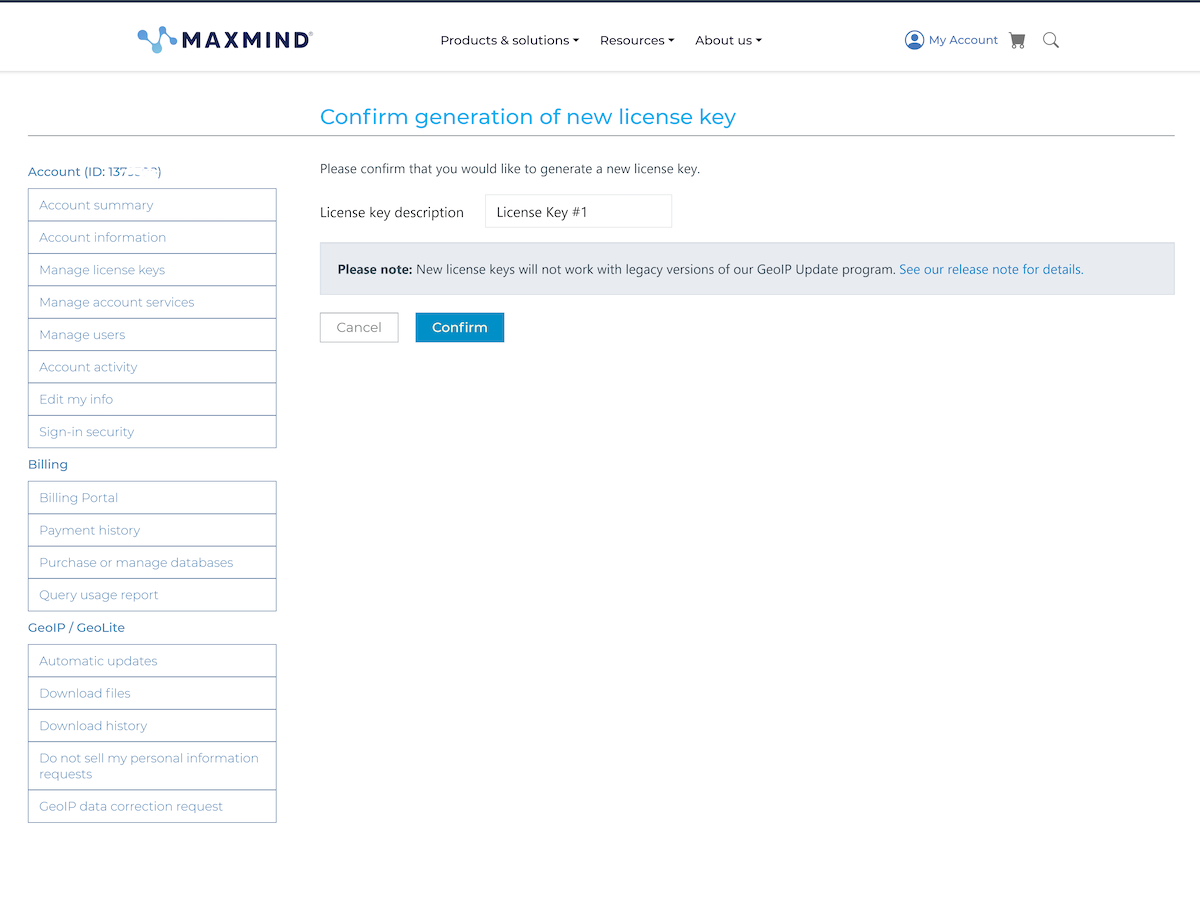
- Once logged in, open My License Keys from your account menu.
- Click Generate new license key.
- Give the key a name you'll recognize later, such as "SiteFort" plus your domain, and confirm creation.
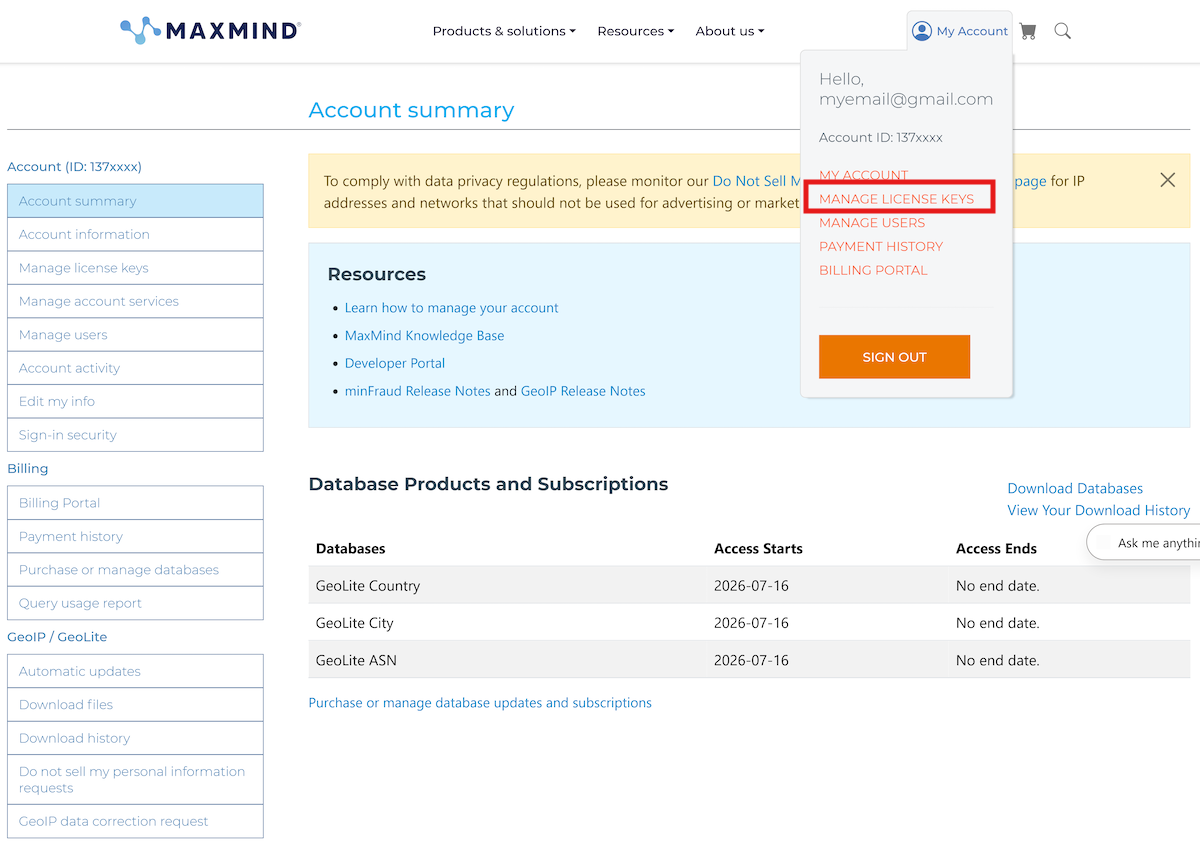
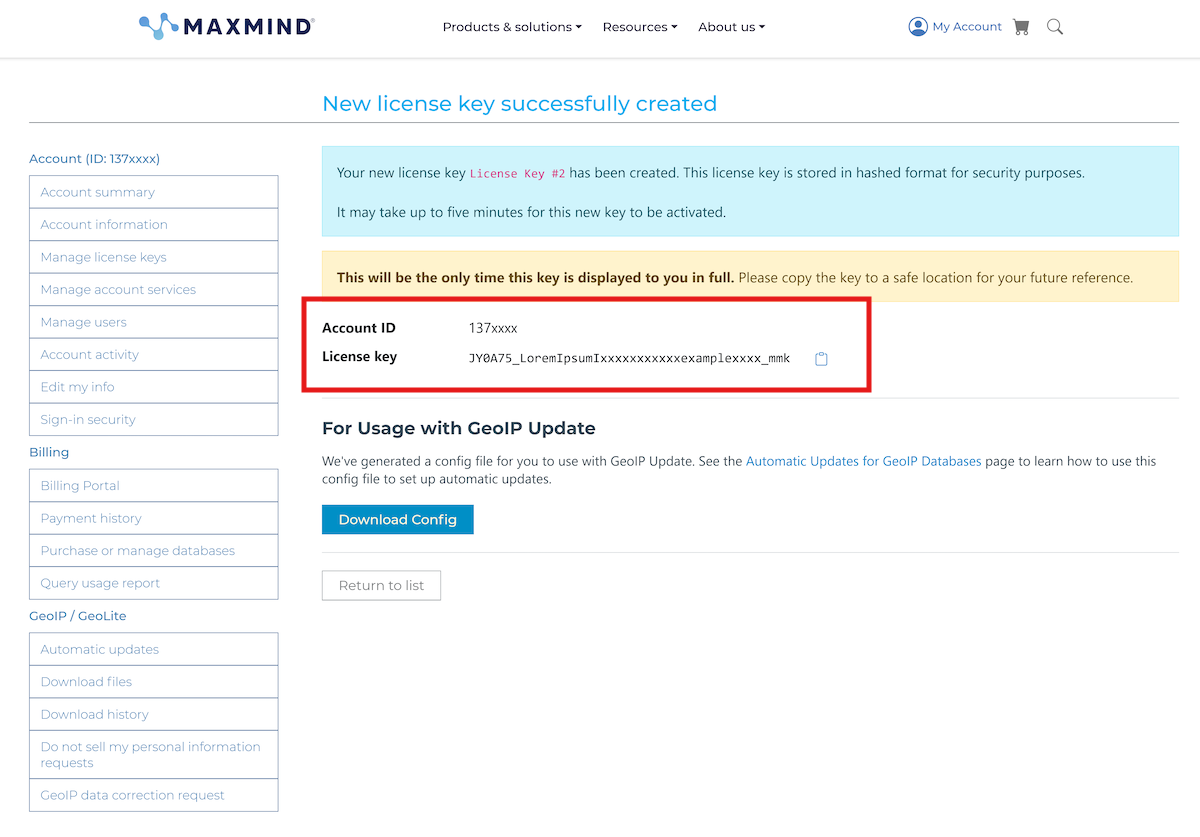
MaxMind shows the license key value once, immediately after generation. Copy it right away, along with your Account ID shown on the same screen.
Step 3: Add the Credentials to SiteFort
- Paste your Account ID and License Key into the matching fields.
- Click Save, then check that Credentials shows as valid.
- Click Update Country Database to download the GeoLite2-Country database to your site.
- Once Database status confirms the download, use Test country lookup to confirm SiteFort is resolving IPs correctly before relying on it for Country Blocking.
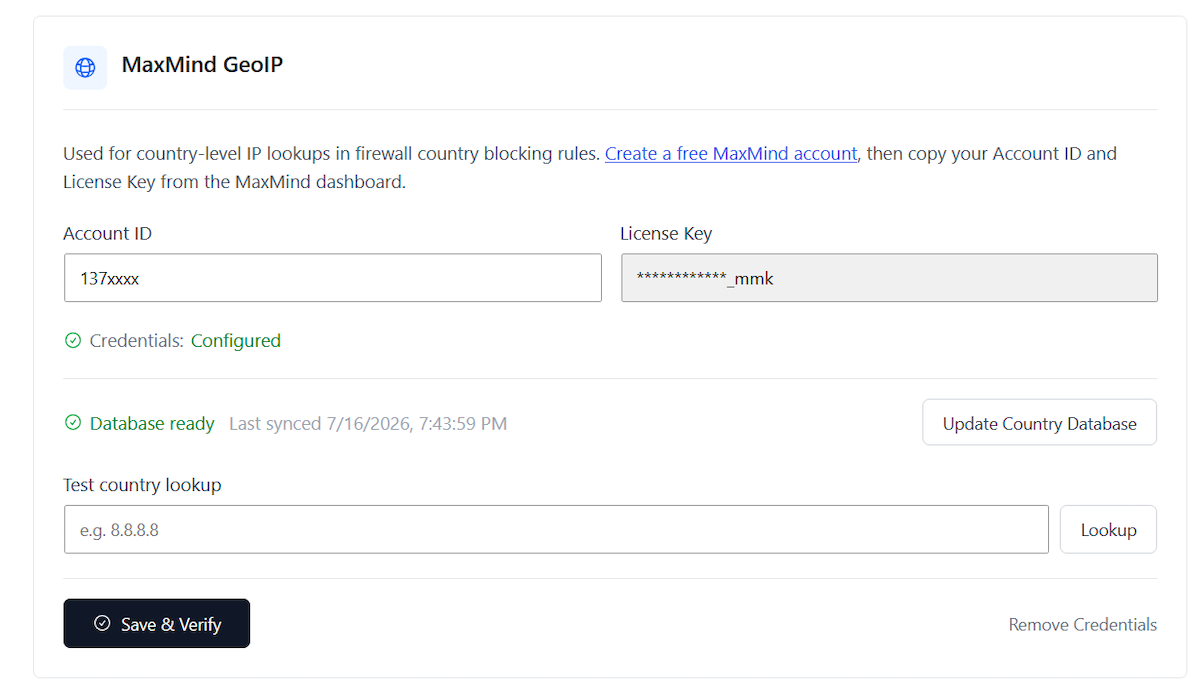
Once Credentials and Database both show valid, MaxMind is available as a country lookup source for Country Blocking on the Firewall page.
CAPTCHA / Bot Detection
Configure CAPTCHA keys here, then enable protection in Hardening > Login Security. Providers include Google reCAPTCHA v2 Checkbox, Google reCAPTCHA v2 Invisible, Google reCAPTCHA v3 Invisible, and Cloudflare Turnstile. reCAPTCHA v3 includes a Score Threshold slider from 0.1 to 1.0. Lower is more permissive; higher is stricter. The UI recommends 0.5.
Secret keys are stored securely. Select the secret field only when replacing it; leave it blank and save to keep the current secret key unchanged.
License & Plan
The License & Plan tab displays license state, plugin version, plan label, expiry when available, revalidation actions, activation flows, and license deactivation. Plan labels visible in the UI include SiteFort Managed, SiteFort Pro, and SiteFort Free.
Free plan text explains that the site is connected on the Free plan and that upgraded subscriptions can be applied with Activate Pro. Paid plan text states that the site is protected with advanced cloud firewall, real-time malware signatures, and audit logging. Active sites can Activate Pro, Revalidate License, or Deactivate License after confirmation.
Advanced Settings
| Section | Settings | Guidance |
|---|---|---|
| Server Configuration | Server Type, Nginx Config File, and Write to Files. | Automatic detection works for most sites. Disable Write to Files when server config is managed externally. |
| Data Configuration | Audit Logging, Log Storage, Log Level, Database Log Retention, and File Log Retention. | Use Standard log level for production unless every routine event is needed. Choose retention based on audit and storage requirements. |
| Danger Zone | Reset Plugin Data. | This permanently erases plugin settings, scan history, and cached data. The license connection must be reactivated afterward. |